Time for another update. It's been a while I know but I've recently completed my revision of THREE French lists and I now feel they are in much better shape than they were when I first published the French Armoured Division Battlegroup list.
So here are the revised and new lists for the French:
French Armoured Division Battlegroup
French Infantry Division Battlegroup
French Rapid Reaction Force Battlegroup
I believe with these lists you should be able to replicate almost any French force from the mid to late 1980's - even possibly the first Gulf War.
The French have some awesome kit - certainly the best Armoured Cars (like the AMX-10RC) of any of the other lists, and also some pretty old and funky stuff (like the AMX-13). I just need access to a complete range of French infantry options and then this is on my "to complete" list as I've already been putting away the odd bit of French kit for years.
Anyway - I think I have the Czechs still to do and then I'm largely calling the Army Lists complete. Also as Battlegroup NORTHAG is coming closer - and will not be compatible with any of my stuff I won't be doing any more on this project.
As NORTHAG has gone in a slightly different direction I've decided to take the work I have done and work it into something different again, with my take on a Cold War game.
More of that in the future.
Thanks
Richard
27 August 2019
29 June 2019
SA-10B Grumble (S-300) Transport-Erector-Launchers (TELs)
Jeepers!! I've just realised it was way back in December 2015 that I first started this particular little project. So it's only taken almost 4 years to finish the primary assets I need to run the scenario I've been planning.
So back here and here I showed you the 5N63S Flap Lid B Engagement Radar and the 5P85S TEL. The 5P85S is kind of the master or smart TEL with the controls and datalink hardware for the entire TEL group.
Today I want to show you my two completed 5P85D slave or dumb TELs - both of which are controlled by the 5P85S TEL.
Here is dumb TEL number 1 - travelling:

In firing position:
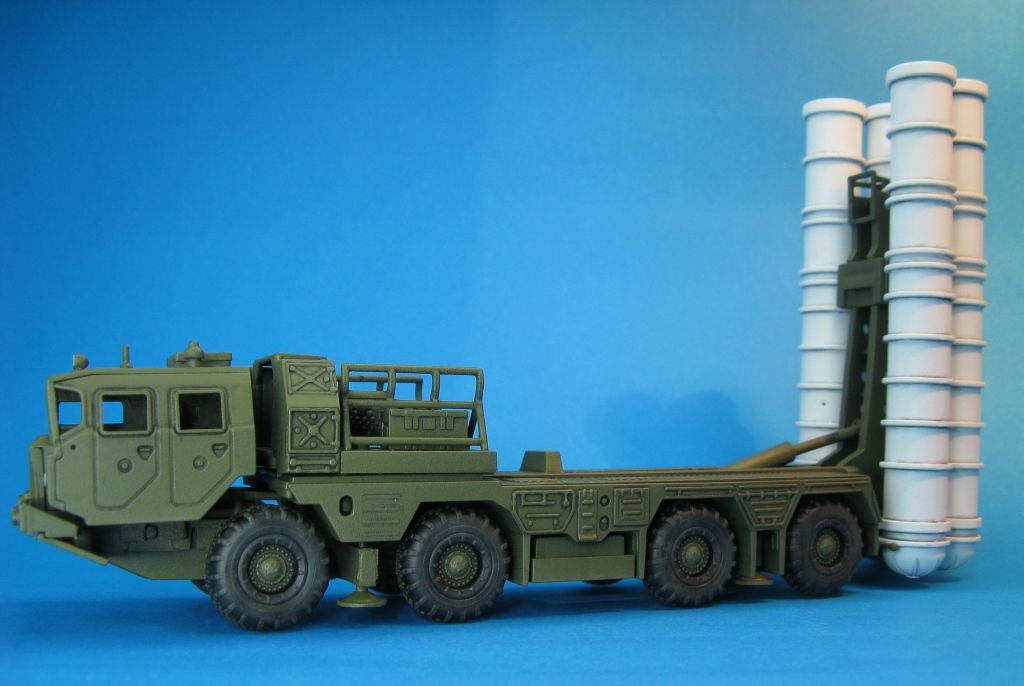
And the second dumb TEL - travelling:
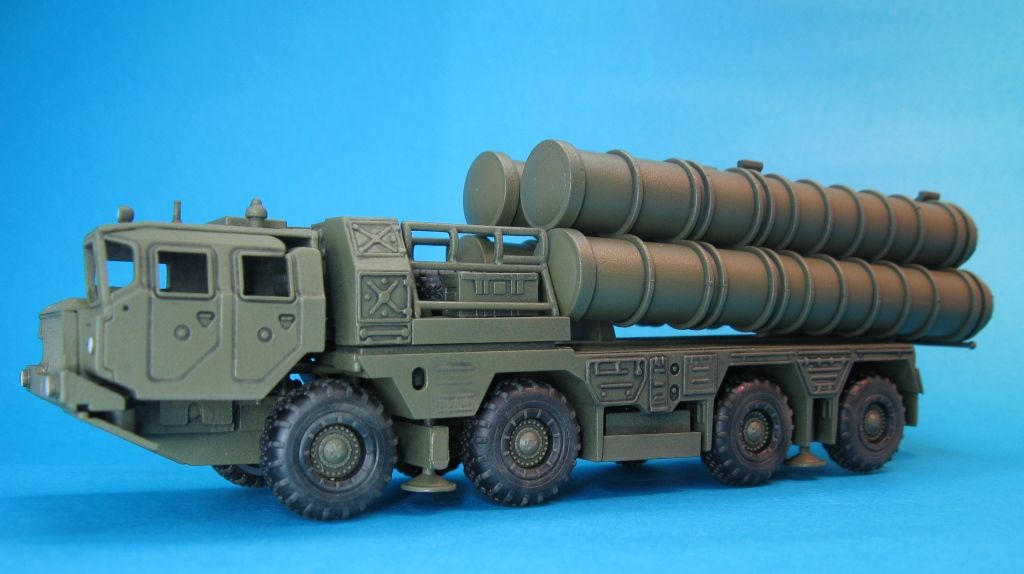
and in firing position:

You can easily see there was a fault with this model. I'm planning on covering it up with a cam net.
Just to prove I haven't just sneakily moved some parts around - here is my Battery:
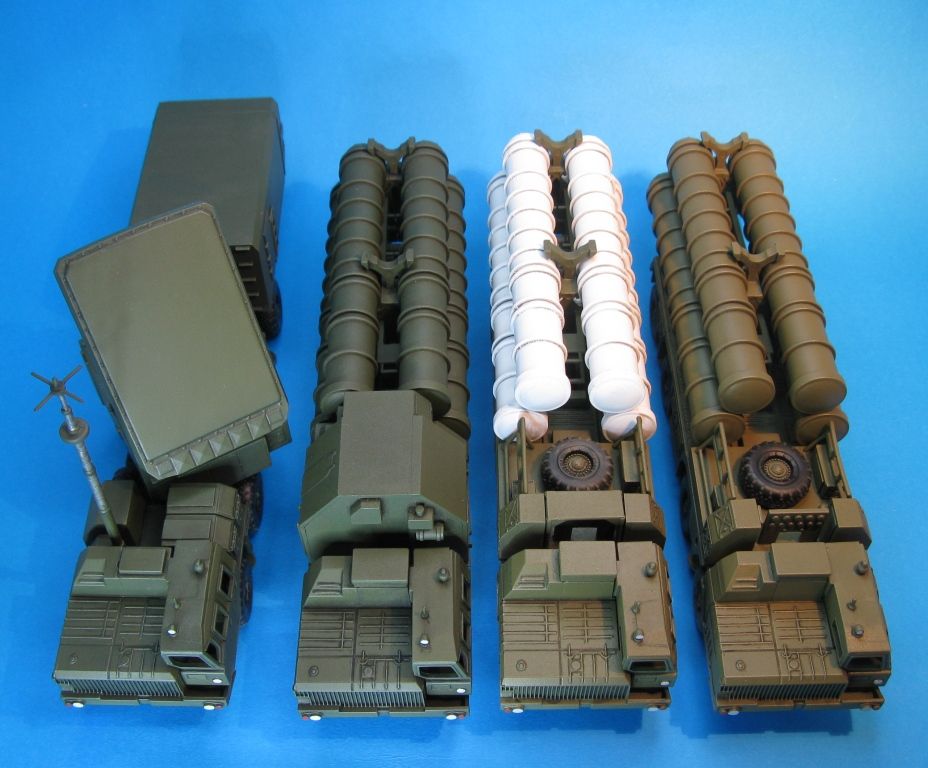
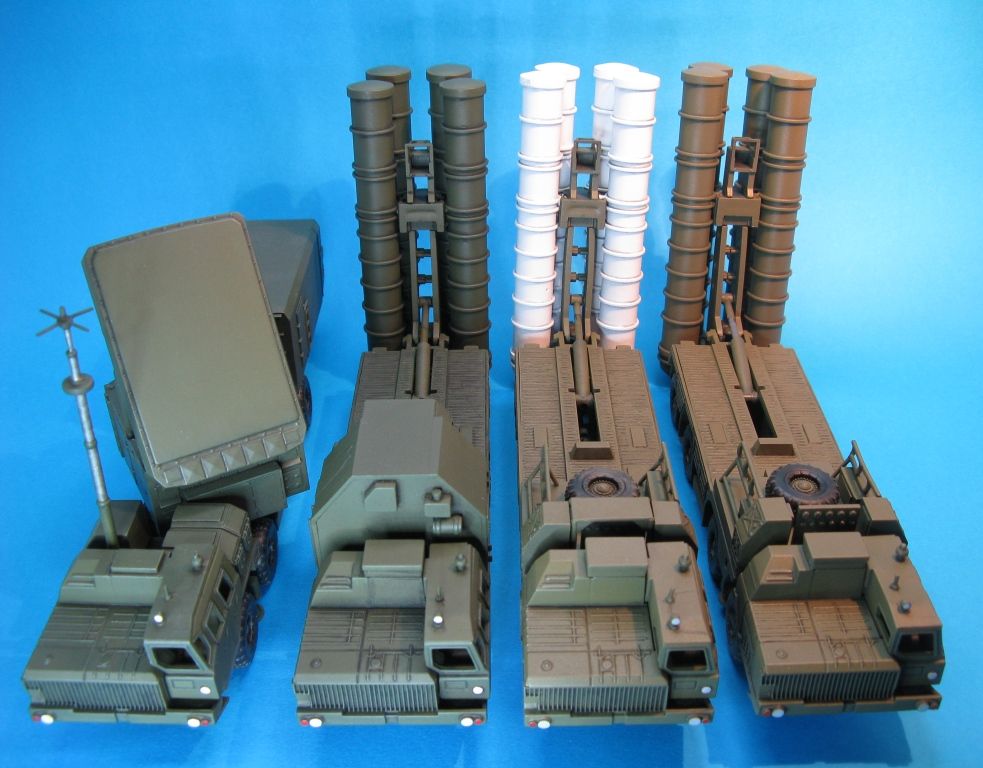
From left to right they are the 5N63S Flap Lid B Engagement Radar, the 5P85S TEL (smart TEL) and then the two 5P85D dumb TELs.
I've seen lots of pictures of the TELs in all different shades and cam patterns, with matching missile tubes, or grey or white tubes etc. So painting one with white tubes (for a Norwegian setting) seemed like a good idea and helps make one TEL look quite different from the others. Likewise the first two vehicles were painted with a generic "Russian Green" while I airbrushed the latest two in MiG 083 (XB518 Zashchitniy Zefeno) which according to MiG paints was the standard basic colour used in the Soviet Union from 1956 to the 1980's - but is still common today. I quite like the colour.
So that's it for now. I'm working on an auxiliary vehicle for the battery, and once it's done I'll start playing through the mission solo and see how it goes.
Thanks
Richard
So back here and here I showed you the 5N63S Flap Lid B Engagement Radar and the 5P85S TEL. The 5P85S is kind of the master or smart TEL with the controls and datalink hardware for the entire TEL group.
Today I want to show you my two completed 5P85D slave or dumb TELs - both of which are controlled by the 5P85S TEL.
Here is dumb TEL number 1 - travelling:
In firing position:
And the second dumb TEL - travelling:
and in firing position:
You can easily see there was a fault with this model. I'm planning on covering it up with a cam net.
Just to prove I haven't just sneakily moved some parts around - here is my Battery:
From left to right they are the 5N63S Flap Lid B Engagement Radar, the 5P85S TEL (smart TEL) and then the two 5P85D dumb TELs.
I've seen lots of pictures of the TELs in all different shades and cam patterns, with matching missile tubes, or grey or white tubes etc. So painting one with white tubes (for a Norwegian setting) seemed like a good idea and helps make one TEL look quite different from the others. Likewise the first two vehicles were painted with a generic "Russian Green" while I airbrushed the latest two in MiG 083 (XB518 Zashchitniy Zefeno) which according to MiG paints was the standard basic colour used in the Soviet Union from 1956 to the 1980's - but is still common today. I quite like the colour.
So that's it for now. I'm working on an auxiliary vehicle for the battery, and once it's done I'll start playing through the mission solo and see how it goes.
Thanks
Richard
15 May 2019
Book Review: Northern Fury - H-Hour by Bart Gauvin and Joel Radunzel
Last week I had to do a bit of air travel for work. When I know I'll be spending several hours in a fairly small plane (in this case a Saab 340) I tend to download a new book to make the whole thing a little more bearable. Fortunately for me I knew Northern Fury had just been released on the Amazon Kindle Store - so I hoped I was in for a treat.
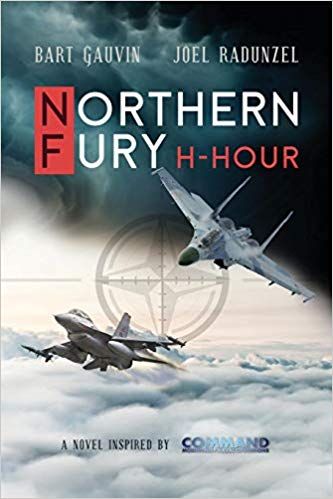
I feel like there are a lot of parallels between Northern Fury and it's famous (in these circles anyway) predessor, Red Storm Rising. Both books have a fairly grand scope. Whilst focusing on specific people (quite a few, like RSR) doing specific things, these things are happening in several locations across the globe, mostly in this book Russia (or a resurgent USSR), Norway and the United States in the case of this book.
When Tom Clancy and Larry Bond wrote RSR, they gamed out many of the scenarios - specifically the naval actions - using Mr Bond's Harpoon ruleset to test out various hypothesis. My understanding was they went with the results of the actions as they played out in the games.
In the case of Northern Fury Bart Gauvin and Joel Radunzel primarily used a computer game "Command: Modern Air/Naval Operations" to game out various actions. I'd guess primarily air actions, but some smaller naval actions in this particular book. I think this lends the book an excellent air of authenticity.
Speaking of authenticity, both authors are current officers in the Canadian and US military's (Army). I guess that doesn't always make a difference (Tom Clancy anyone) but it certainly helps in books like The Third World War & Untold Story (General Sir John Hackett), Team Yankee (Harold Coyle), Red Army (Ralph Peters), the Red, Black & Blue Effect (Harvey Black). The authors mention many of these books in their foreward.
I'm not going to go into what happens in the book. I don't want to give anything away as I think you need to be a little bit "unaware" so you can be caught by the surprises that happen in the book. The authors have their own website and blog here and they provide a brief overview here. The website also has a quite a bit of useful information on it re WARPAC and NATO forces focussing now on Norway which is nice. Their blog has more interesting bits and pieces like some of the bits that got cut from the novel.
So what did I think of the book? Basically I loved it! Gauvin and Radunzel have come up with a unique and quite believable setting, a few years after the Cold War novel standard date range and it really works. They link in several other well known events, like the winter Olympics in a very cool way - so I was super impressed.
I enjoyed the characters, the research is obvious - I do wonder if either of the authors have traveled/worked in Norway as that all felt pretty real. The vehicle, aircraft, helicopter, weaponry descriptions all felt accurate without feeling laboured. There is no sentences like "... he carefully sighted his 7.62mm Kongsberg Våpenfabrikk AG3 battle rifle at the Soviet VDV paratrooper who had just slide of the side of the still moving BMD-1 (Boyevaya Mashina Desanta) airborne mechanised assault vehicle, whilst carrying his 5.45mm RPK-74 squad light machine-gun." Thank goodness!
The worst thing about the book is that it finished... Beware that unlike RSR this is not a complete story in one book. It really is about the lead up to war and then the first few hours of the war. There is much yet to come and I want to read about it! I hope the authors do well enough from this publication to continue to be motivated to write the rest of their story. I for one will snap up each book as it comes out. I can honestly say that in my opinion, this book ranks up there with the best of the books of the genre and I can't wait for the next one.
Thanks
Richard
30 April 2019
The Berlin Project - Land Rovers
It's been a while since I've shown anything for my Berlin Project - not because I've forgotten about it, it's just Project 57 of the 345 projects I seem to currently be doing...
Anyway, I've time for a quick update, showing off a couple of Oxford Diecast Land Rovers I've picked up recently, both in the British Berlin Brigade urban camo pattern. First up is a Lander Rover 101 FC.
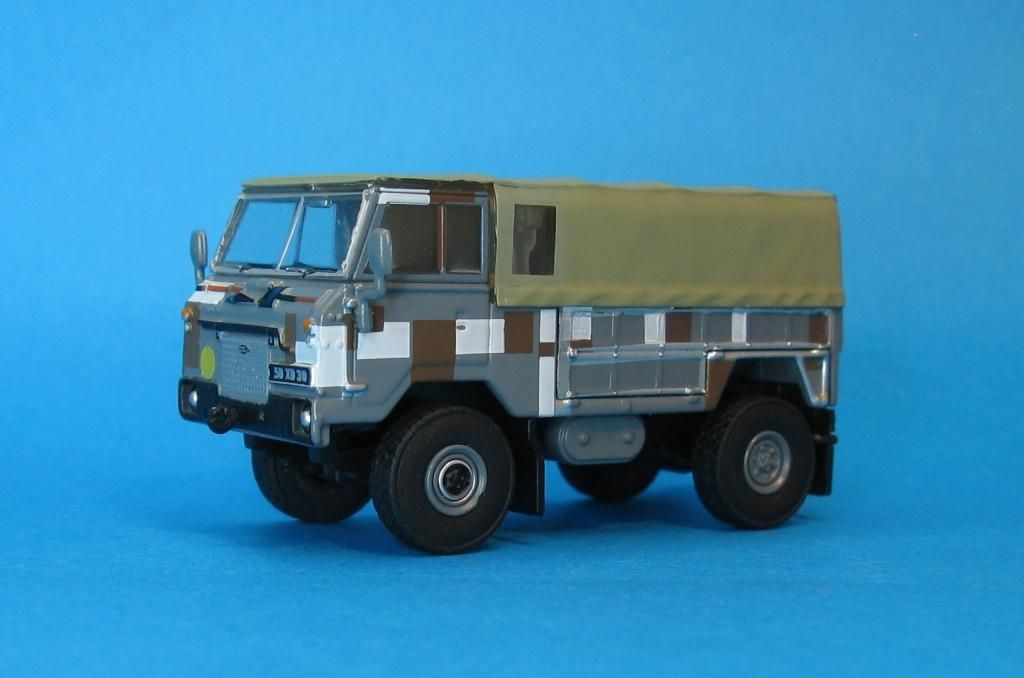
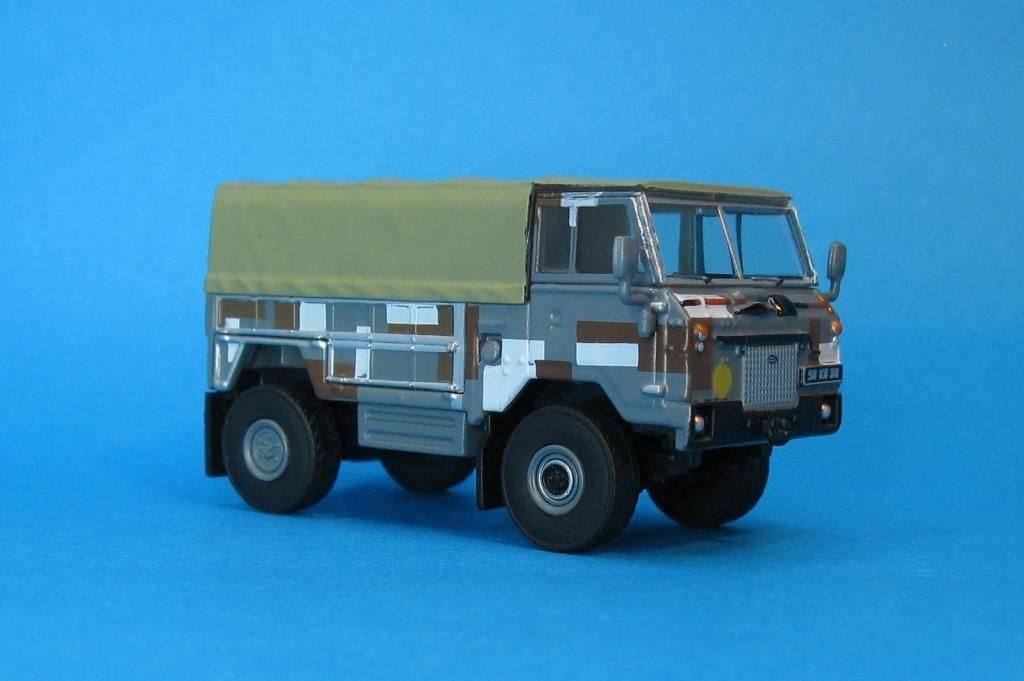
I've now got two of these and I'll be using them to transport a Milan team and a Medium Mortar team.
Next up a 1/2 ton Land Rover


I'm thinking I'll use this to transport my Mortar Fire Controller.
I've actually no idea if the Berlin Brigade painted these vehicles in this fashion as I've only seen pics of more "standard" Land Rovers in the Berlin urban cam scheme. I'm not even sure if the Brigade used the 1/2 ton Land Rover at all. But hey, they look pretty good to me and I'm just happy I have another couple of vehicle I don't have to paint in that scheme!
Catch ya soon
Richard
Anyway, I've time for a quick update, showing off a couple of Oxford Diecast Land Rovers I've picked up recently, both in the British Berlin Brigade urban camo pattern. First up is a Lander Rover 101 FC.
I've now got two of these and I'll be using them to transport a Milan team and a Medium Mortar team.
Next up a 1/2 ton Land Rover
I'm thinking I'll use this to transport my Mortar Fire Controller.
I've actually no idea if the Berlin Brigade painted these vehicles in this fashion as I've only seen pics of more "standard" Land Rovers in the Berlin urban cam scheme. I'm not even sure if the Brigade used the 1/2 ton Land Rover at all. But hey, they look pretty good to me and I'm just happy I have another couple of vehicle I don't have to paint in that scheme!
Catch ya soon
Richard
20 March 2019
The Zealand Campaign - Game 2 - Follow-On Attack - After Action Report
So with the table set it was time to get on with the game. First up the Danish player was able to palce both his Centurions, the M41, a Forward Observer, 1 Mech Squad in their M113A1, the M150, a single medium Mortar, the HJV Platoon Command all in his deployment zone.
 The Centurion Platoon Leader's Tank, an M113A1 and the Forward Observer deployed in and around the barn across the road from Lystrup &Jomfruens Egede Godser main house.
 On the opposite side of the table the medium mortar is deployed and in the distance you can see the HJV Platoon Command Squad.
 The M150 (on Overwatch) and another Centurion cover the centre of the table.
 Here's another view of the centre and left flank. The M41 is hidden in the Lystrup &Jomfruens Egede Godser courtyard.
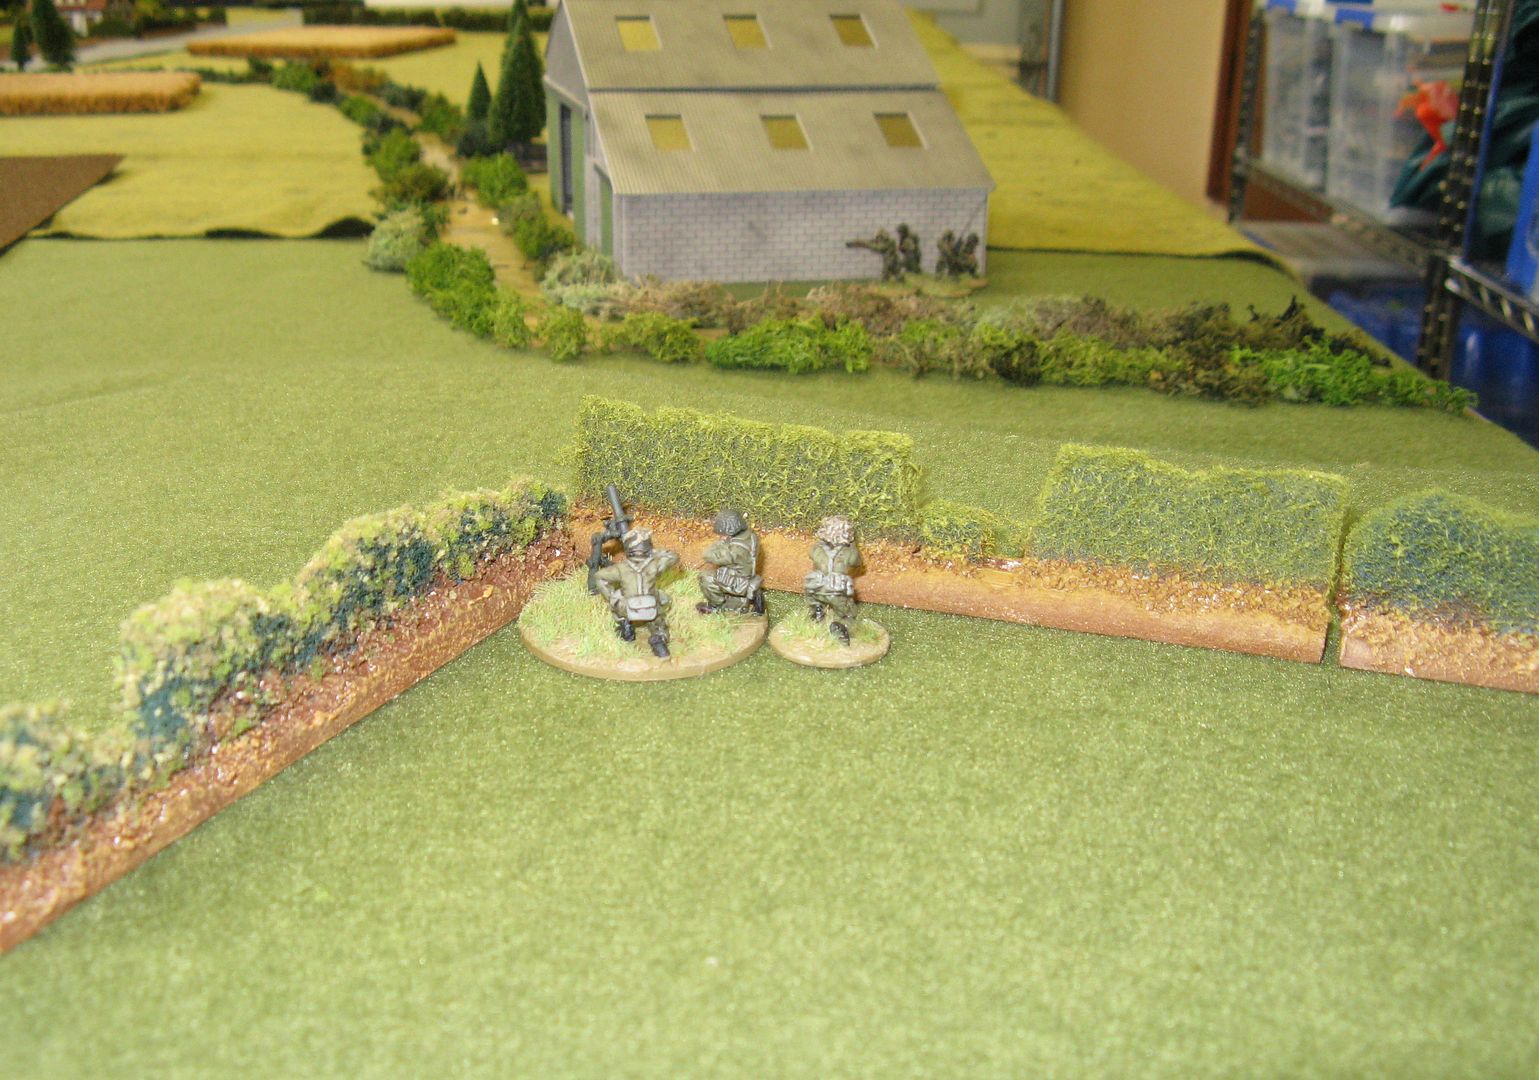
 And here's another shot of the HJV Platoon Command (also shown in yesterday's post). The final 2 units on the table - an HJV Squad and the HJV MAW Team were not actually placed on the table, but were "hidden" in and around the house in the picture below - the Soviet Player had no idea of this.
 The Soviets led with their recon BRDM-2, the sacrificial lamb that was sent up the main road, mainly to see how many overwatch shots and missiles it could attract. Only 1 105mm main gun round it turned out, was necessary to ruin the BRDM's day.
 3 T-55AMV's also raced up the road as far as they could, laden with 2 Soviet Naval Infantry Squad and an Anti-Armour Squad, all of whom had lost their BTR-60PBs in the previous game. In the distance you can see a blown up UAZ-469, which must have taken a round through the bonnet (hood for Americans) totally destroying it, but leaving the Mortar Fire Controller completely unharmed (but pinned for good measure. The other UAZ also emerged unscathed.
 Here are the T-55AMV's and their passengers again.
 Other units also started to slowly move up the table, struggling in the wet ground. The SA-9 in the background remained there for almost the entire game as the Soviet's really had a difficult time activating all the little units that were not part of a platoon. Based on what happened in this game I have had some ideas to tinker with my Soviet Orders rules.
 The BTR-60PB carrying the 120mm SNI mortar team took a couple of turns to get into the right position on the edge of the woods before deploying the heavy mortar.
 The Ambush is sprung. A MAW round hits the T-55AMV closest to the house but fails to penetrate due to the reactive armour. The explosive does drive the Squad riding the tank off and they are pinned behind a hedge. The HJV Squad fires their one M72 LAW at the tank adjacent to the first hit tank, which misses and the rest of the squad open fire at the tank riders, massively depleting that squad (down to two men) who are also pinned against another hedge.
 A different shot of the action. The two front T-55AMV's were also shot at by a Centurion and the M150, both of which missed.
 Scattering artillery did however manage to pin one of the PT-76's crawling through the mud.
 Whilst the T-55AMV's tried to deal with a multitude of targets, and unpin all their units, the M150 targeted one of them from cover....
 ... and managed to take out the first T-55AMV. The reactive armour roll was poor, perhaps the missile hit the same spot as the Carl Gustav team, because it easily penetrated and destroyed the target.
 Meanwhile the remainder of the SNI on table force continued to prepare. The ZSU-23-4 was put on Ambush Fire when after finally inflicting 3 BR chits (the loss of the MAW Team, the HJV Squad and an objective) the Danish player drew 2 planes and an Out of Ammo chit, which was played on the mortar, which did not fire another shot for the rest of the game.
 Danish reserves started to show up. With the Mech Platoon Commander happy to sit in his M113A1 up the back of the table and call in fire from the off-table mortar battery, the other Squad set off across country to reinforce the Dane's right flank. Unfortunately two "1's" were rolled and the M113A1 was bogged in the mud for the rest of the game.
 The first real bit of luck for the Soviets when they managed to get in contact with a battery of 122mm guns whose barrage landed exactly where it was needed, killing the Centurion Platoon Commander (and his tank) and pinning the M41
 The Mortar's BTR-60PB continues to advance.
 Now the flanking force started to arrive. This was a total surprise for the Danish player, whose been so busy lately he didn't get a chance to properly read the scenario. The Soviet player did read the scenario!
 On they came across the stream. I actually wanted them to arrive on the road, but I couldn't get it to go exactly where I wanted it so they came on where they came on.
 It didn't really make much difference for the Soviets though as they took out both the M41 and the M113A1 they could immediately see.
 As this was happening in the centre of the table there was an exchange of losses. The remaining Centurion took out the second T-55AMV.
 Then the remaining T-55AMV, stationary behind the two burning wrecks of his platoon mates calmly slotted the M150, the Danes most damaging weapon.
 The final shot of the game was of the burning Danish wrecks. This was the end of Turn 7. The Soviets had been taking chits every turn since Turn 5 as they hadn't won the game fast enough. The Danes were down to 3 Mech Infantry Squads, 1 functional M113A1 and a Centurion, plus the FO team, the HJV Command Squad and the medium mortar.
The Soviets had only lost 2 T-55AMVs and a BRDM-2, plus some Naval Infantry.
Interestingly the Soviets had suffered much more BR damage, while the Danes were sitting pretty as they had draw 2 planes, and out of ammo chit, and one other Name chit which I can't remember.
Had we had the time for one more turn a whole BTR-60PB mounted platoon could have come onto the table and immediately assaulted the barn where the FO and 1 Mech Squad were based. They could have been supported by the 3 T-55Ms that were also on that flank and by the T-55AMV which would have started moving up the table. Turn 8 would not have been a happy turn for the Danes.
So the bottom line was that the Soviets were able to push the Danes out of this position much more effectively than Game 1 where the Danes left the table when they felt like it. The surprise flanking move really smashed the Danes, and the Danish player not being prepared for it made it much more devastating.
So once again, fun was had by all and sometime in the next 12 months we might get a couple more games in the Campaign completed!
Thanks for reading
Richard
19 March 2019
The Zealand Campaign - Game 2 - Follow-On Attack - Lists and Table Set-Up
OK - so onto the lists and table. First up - the Army Lists bearing in mind these were the remnants of both forces from Game 1.
Soviets
1 x Soviet Naval Infantry Platoon (SNI), with 3 BTR-60PBs, a Metis Team and a SVD Marksman
1 x Depleted SNI Platoon with no BTRs, only 2 squads and an attached SA-7 team
1 x Anti-tank Section with no BTR, 1 x SPG-9 and 1 x Metis Team
1 x Mortar Team with a 120mm Mortar and a BTR-60PB
T-55AMV Platoon with 3 Tanks
T-55M Platoon with 3 Tanks
2 x PT-76 Light Recon Tanks
1 x ZSU-23-4
1 x SA-9
1 x BRDM-2
1 x Mortar Fire Controller with a UAZ-469
1 x Shore Fire Control Party with a UAZ-469
2 x 1st Target Priority Fire Missions
Total Points: 627 Total BR:35 No Officers but 4 Platoon Commanders
Danes
1 x Mechanised Infantry Platoon in 3 M113A1, with 3 M72 LAWs
1 x Self-Propelled Anti-tank Team in a M150
1 x Medium Mortar Team
1 x Depleted Hjemevaernet (HJV) Platoon with 1 M72 LAW & "Behind Enemy Lines"
1 x HJV Medium Anti-tank Team with "Behind Enemy Lines"
2 Centurion Mk 5/2 DK Tanks (one of with is an Officer)
1 x M41 Light Recon Tank
1 x SAM Team with Stinger
1 x Forward Observer
Off-Table 120mm Mortar Battery
2 x 1st Target Priority Fire Missions
Remote Control Demolition of Bridge
Off Table TOW Shot
Total Points: 488 Total BR:25+1D6 Officers: 4
So the Soviets had a pretty decent point and BR advantage in game terms, but had to do all the attacking over difficult terrain.
Now the Table:
 This is the view from the SNI end of the table. There is a slight rise at the Danish end of the table and also a small creek running across the table, which at most points was similar to the Danish Deployment zone. The building in the top left hand corner is part of the aerodrome, while that one the right top corner is Lystrup & Jomfruens Egede Godser.
 This is the table from the Danish point of view with Lystrup & Jomfruens Egede Godser in the close left hand corner. Again you can see the creek in the middle distance. The black dots you can see are the deployment zone markers I used.
 A closer shot of the creek, full of dirty water. To cross it, a vehicle had to move up to the edge of the creek and stop, then move is off-road movement value minus 1D6. Again you can see deployment zone markers.
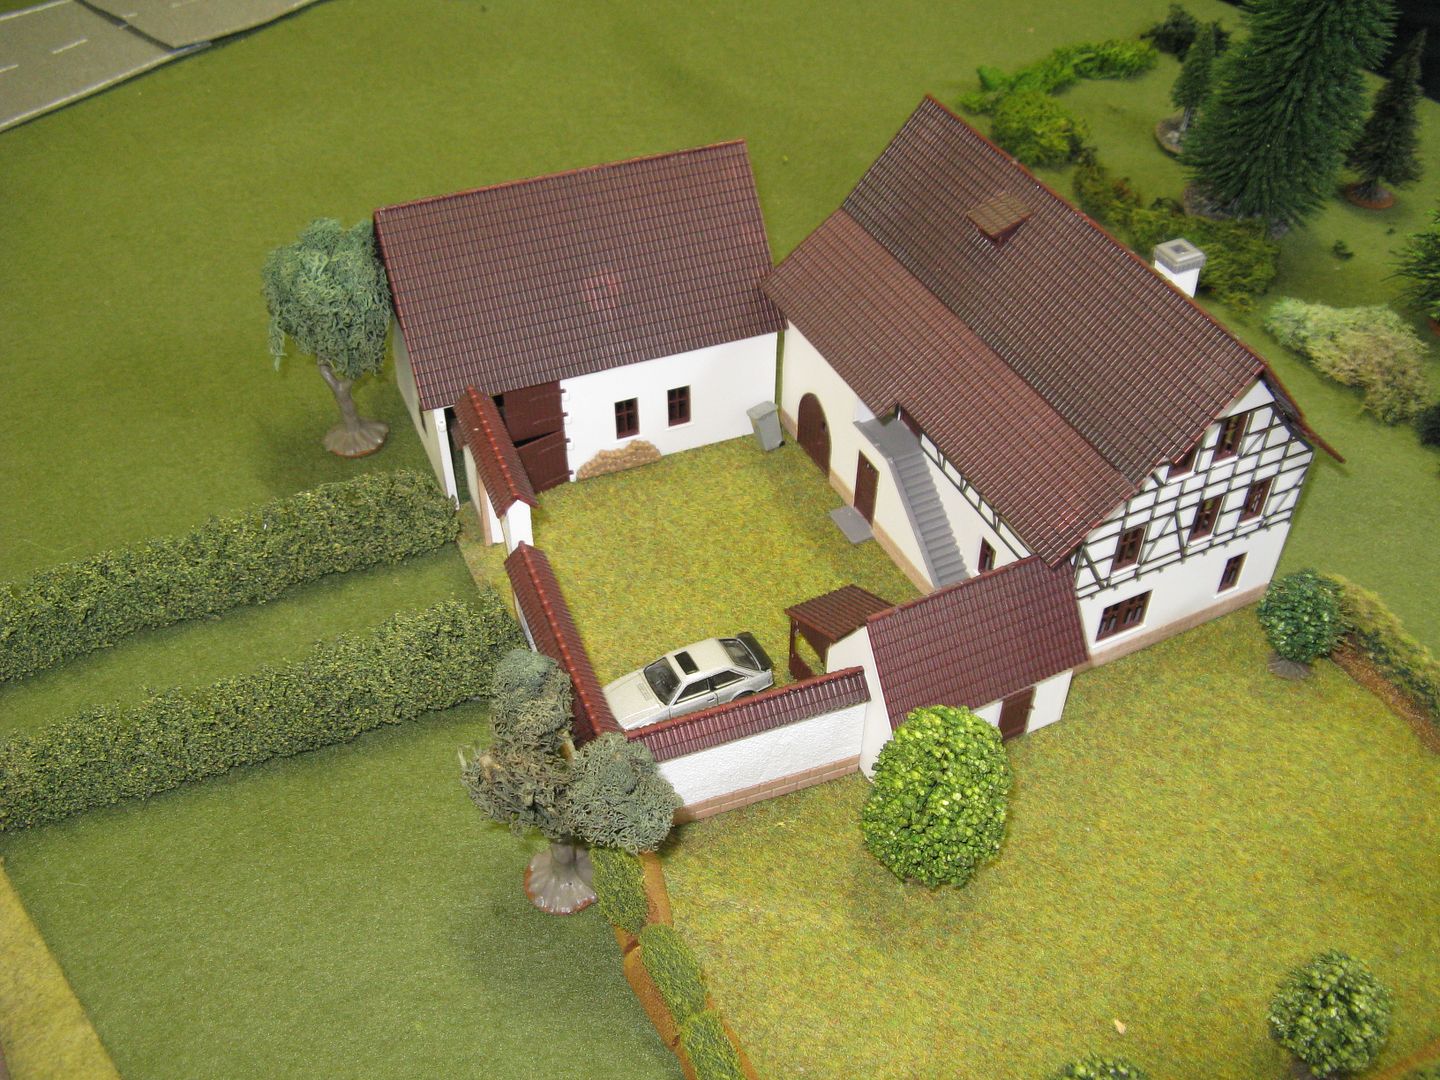
 This is my slightly dodgy version "Lystrup & Jomfruens Egede Godser" which I think basically means Lystrup and Jomfruens Estate. It's much grander in real life, but this will do.
 Part of the estate is some structures across the road from the main buildings. I have represented that with this barn structure.
 Much closer to the Soviet is this small cottage, surrounded by hedges and some trees. Unbeknownst by the Soviet players one HJV squad and the HJV MAW Team were hidden in this house ready to spring an ambush.
Although this is an in-game photo, I'm using it here to show part of the table set-up so the photo may get used again in the next post. This is meant to represent buildings that are part of Ost-Sjaellands Flyveklub or East Zealand Flying Club. It also shows on the map as Kongsted Svaeveflyveplads which I have no translation for but I understand this area is a flat, grassed glider and light plane aerodrome. Comprehensive readers might also remember this aerodrome was one of the Soviets objectives as the are planning on basing all their helicopters here, at least temporarily.
So that's the Army Lists & the table set-up. I was planning on having the AAR as part of this post as well, but it's already long enough so I'll deal with that tomorrow.
Thanks
Richard
Soviets
1 x Soviet Naval Infantry Platoon (SNI), with 3 BTR-60PBs, a Metis Team and a SVD Marksman
1 x Depleted SNI Platoon with no BTRs, only 2 squads and an attached SA-7 team
1 x Anti-tank Section with no BTR, 1 x SPG-9 and 1 x Metis Team
1 x Mortar Team with a 120mm Mortar and a BTR-60PB
T-55AMV Platoon with 3 Tanks
T-55M Platoon with 3 Tanks
2 x PT-76 Light Recon Tanks
1 x ZSU-23-4
1 x SA-9
1 x BRDM-2
1 x Mortar Fire Controller with a UAZ-469
1 x Shore Fire Control Party with a UAZ-469
2 x 1st Target Priority Fire Missions
Total Points: 627 Total BR:35 No Officers but 4 Platoon Commanders
Danes
1 x Mechanised Infantry Platoon in 3 M113A1, with 3 M72 LAWs
1 x Self-Propelled Anti-tank Team in a M150
1 x Medium Mortar Team
1 x Depleted Hjemevaernet (HJV) Platoon with 1 M72 LAW & "Behind Enemy Lines"
1 x HJV Medium Anti-tank Team with "Behind Enemy Lines"
2 Centurion Mk 5/2 DK Tanks (one of with is an Officer)
1 x M41 Light Recon Tank
1 x SAM Team with Stinger
1 x Forward Observer
Off-Table 120mm Mortar Battery
2 x 1st Target Priority Fire Missions
Remote Control Demolition of Bridge
Off Table TOW Shot
Total Points: 488 Total BR:25+1D6 Officers: 4
So the Soviets had a pretty decent point and BR advantage in game terms, but had to do all the attacking over difficult terrain.
Now the Table:


So that's the Army Lists & the table set-up. I was planning on having the AAR as part of this post as well, but it's already long enough so I'll deal with that tomorrow.
Thanks
Richard
18 March 2019
The Zealand Campaign - Game 2 - Follow-On Attack
Well it's been a while since I've been able to post up anything but new lists, rules etc but my life has finally settled enough that I can start playing a few games.
Back in
December 2017 a couple of mates and I had the first game in my Zealand Campaign. I’m not expecting anyone to remember that (I
barely could) but if you want to read about it, you can find some background
information here, copies of the Operational Orders here, the pre-game and table
set up here, and the After Action Report here.
In a
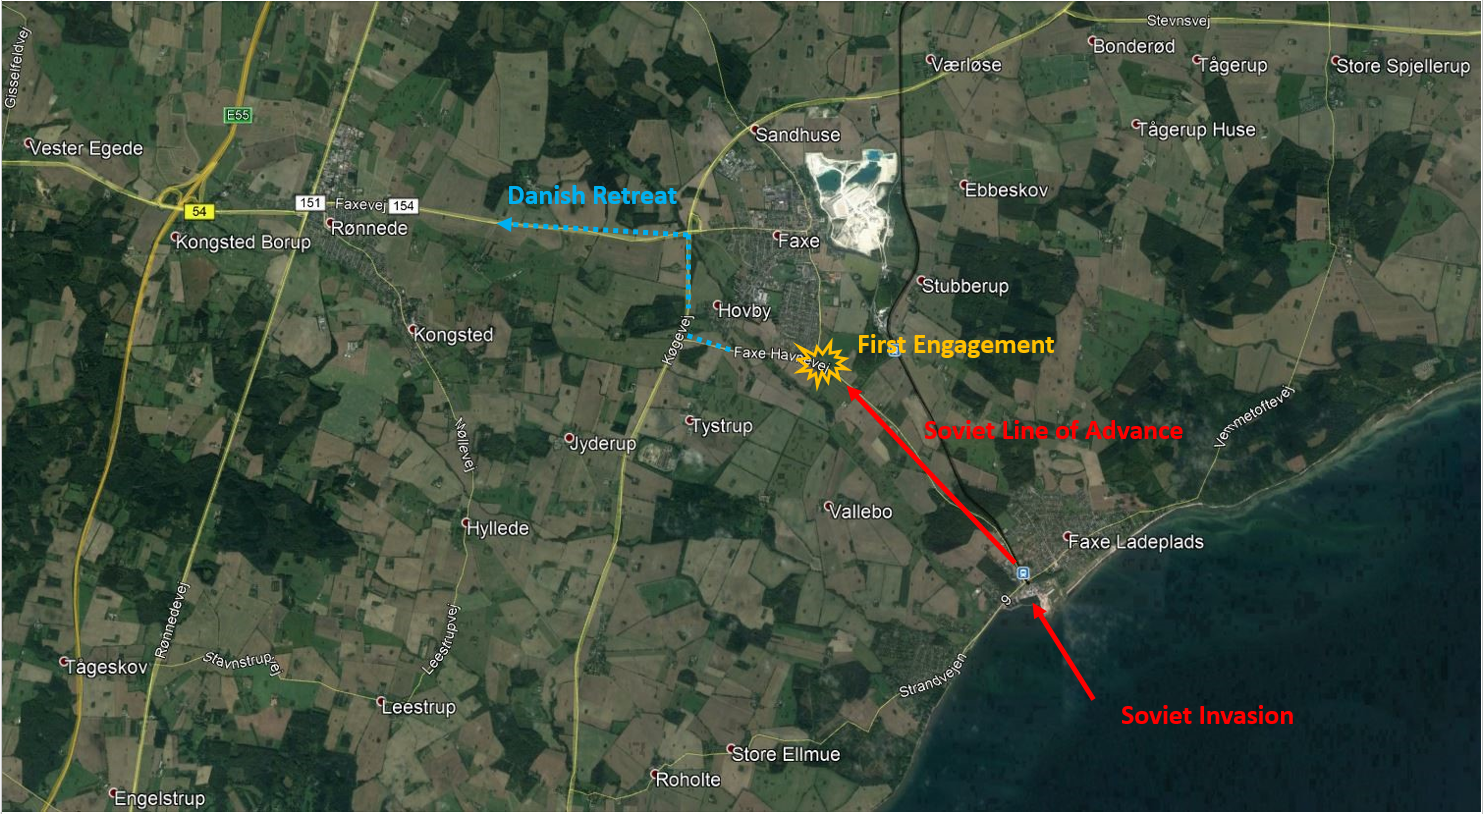
nutshell, WW3 began on 7 July 1986.
Today’s date is 16 July 1986. Polish
Airborne and Naval Infantry landed on the Danish Island of Zealand yesterday
near Ringsted and Koge respectively. Earlier
this morning elements of the Soviet 336th Naval Infantry Regiment
started landing at the small port of Faxe Ladeplads, to the south of Koge.
In Game
1, the assault elements of 336 NIR set out to establish a beachhead. Driving inland they came across the first
significant Danish resistance to the East of the town Faxe. A small delaying action ensued with the Danes
withdrawing to the West.
Both
sides had incurred casualties, with the Soviets loosing 4 BTR-60PBs plus a
couple of 9P148’s (BRDM-2s with Konkurs ATGMs).
The Danes lost less in terms of numbers, but more in terms of need. They lost a M41 Recon tank and a Centurion Mk
5/2DK.
My first
step was to give the Soviet player a set of choices, in the days before the
game, on how he would proceed. What I
presented to the Soviet player was as follows:
1.
Immediately continue the attack with what you have at hand
This
option gives the Danish player no time to dig in at the next line of resistance,
or replace losses and we will treat the game as a Flanking Attack. However, your force will be similar to Game
1, minus 4 BTR-60s and the 2 Scout Cars with missiles (all losses from Game
1). The battle will take place along the
154 road from Faxe to Ronnede.
2.
Reset Force, allow units to reconstitute back to full strength
This
option will mean that the Soviet forces will not pursue the Danes until about ½
an hour after the first encounter as you sort out casualties, replacements and
new units. It means the Danes will have
had time to set up minimal defences and maybe replace some losses. Your force will be similar to Game 1, fully
reconstituted from Wave 1 reserves. The
battle will take closer to Ronnede, at a place of the Danes choosing and the
game will be a Hasty Defence.
3.
Allow 1st Wave follow-on forces to take over the attack while force from
first contact take over the town of Faxe
This
option will mean that the Soviet forces will not pursue the Danes until about
an hour or more after the first encounter.
It means the Danes will have had time to set up reasonable defences and
replace their losses. Your force will be
tank heavy, with a complete Infantry platoon attached. The battle will be a Deliberate Attack and
the Soviet player will have a choice of approaches to Ronnede.
The Soviet player straight away choose the immediate
follow-on attack option in true Soviet style!
The next choice to make was for the Danish player. I had a good look at the satellite Google map
of the area where the game would now be played and selected two likely spots that
offered some defensible terrain – at least to my very unprofessional eyes. I created two possible game maps from the
image and asked the Danish player to select one to defend.


The Danish player selected Map 1 and then I offered him the
engineering choices I had previously selected from the Danish Defences
options. I choose only those things that
would have taken the engineers limited time to prepare (or perhaps in the case
of the bridge they had been preparing it for a while). Here are the options I presented to him.
Table Option 1
Remote Control Demo of Bridge
Off Table TOW Missile Shot
Or
Improvised Barricades
Improvised Road Block
Cellar Shelter
Off Table TOW Missile Shot
The Danish player selected the option to blow the bridge
(actually I think more of a culvert) and the off table TOW shot.
Then I prepared the mission which I’ve copied in full below:
DANISH CAMPAIGN – SCENARIO 2 –
FOLLOW-ON ATTACK
Situation Report
Following
the earlier engagement, Danish forces have retreated further inland with the
Soviet’s right behind them.
Knowing
the area well the Danish Commander has chosen another spot to defend with the
remnants of his force. The more time he
defends, the more time other Danish reinforcements have to insert themselves
between the Soviet Naval Infantry and the Polish Paratroopers, and secure the
main highway to Copenhagen.
The
Soviet Commander has orders to push inland as fast as possible and secure the
MSR. Time is of the essence, and any
delays will prove costly.
Terrain
The 154
road from Faxe to Ronnede runs along the centre of the table. There is also a secondary road the runs into the
Danish deployment area. The rest of the
table is covered in farmland with a small stream running across the table
crossed by a bridge.
It has
been raining consistently for the last few days and the land is more boggy than
normal. All vehicular off road travel
should subtract 1D6 from the movement rate.
On a “Top Speed” order two rolls of a “1” indicates the vehicle is
bogged.
Victory
The side
that exceeds its Battle Rating must withdraw and losses the battle. The Danish Player cannot claim an All Objectives
Secured victory, but the Soviet player can.
Special Rules
Low
Cloud Cover
If an
aircraft chit is draw, the aircraft becomes available on a roll of a 6+ rather
than a 5+
Pursuit
For each
3 Soviet units that leave the table through the Danish player’s table edge, the
Danish Player must take an additional BR chit
Time
is Pressing
The
Soviet’s do not have much time to remove this obstacle to their advance. If at the start of turn 5 the Danes are still
fighting, the Soviet Player must take a BR chit at the start of each of his
turns.
If the
Danish forces are still fighting at the beginning of turn 10, the Soviet Player
must take two BR chits at the start of each of his turns until the end of the
game.
Deployment
1.
The
table sides each force will deploy in are shown on the map
2.
Place
Objectives
Place
D3+1 objectives on the table. The first
objective is the road junction. The
second is the bridge. After that the
Soviets place and next objective and then the Danes. Repeat as required
3.
Determine
the Defenders Initial Forces and Deploy
At the
beginning of the game, place the Danish player’s defences and D6+6 units on the
table, anywhere in the Danish deployment zone.
Any units not deployed as the Dane’s reinforcements.
4.
Ambush
Fire
D6
Danish units can be placed on Ambush Fire.
5.
Deploy
Attacker’s Initial Forces
The
Soviet player then places all Recon units and 2D6+6 additional units. These may be deployed up to 10” from the
Soviet table edge. Any units not
deployed are the Soviet’s flanking force.
6.
First Turn
The
Soviets are attacking and automatically have the first turn.
7.
Soviet
Flanking Force
Any of
the Soviet player’s units not initially deployed for the attack are his
flanking force, attempting to use side roads to work around the Danish flanks. The Soviet player should write down whether
he wants his flanking force to arrive from the North or the South.
At the
start of Turn 4, start rolling for the arrival of the Soviet flanking
force. On a 4+ they arrive and D6 units
are placed on the northern or southern table edge, within 10” of the centre
line (as written down). They can then be
given orders as normal.
D6 units
will continue to arrive on each subsequent turn until the entire flanking force
is on the table.
8.
Danish
reinforcements
Any Danish
units not initially deployed are reinforcements.
From the
start of Turn 2, roll a D6. On a 4+
Danish reinforcements have arrived. D3
units may be placed on the Danish players’ table edge and can be given orders
from there. D3 units can arrive each
turn until all Danish units are on the table.
So all that was need now was to set up the table according
to the photo and get on with it.
All that plus more in the next post!
Thanks Richard.
18 February 2019
My Unofficial Battlegroup: Cold War - UPDATED - New AFV Data Tables
Hi Everyone
Another quick update - this time with four new AFV Data Tables for the Norwegians, Belgian, Polish and East Germans. The Norwegian table has been updated to match the new version of the army list while the Belgian, Polish and East German AFV Data tables are brand new, and should (hopefully) cover everything in each of those nationalities lists.
If you can spot any problems with the tables, please let me know.
Here they are
Norwegian AFV Data
Belgian AFV Data
Polish AFV Data
East German AFV Data
Thanks
Richard
31 January 2019
My Unofficial Battlegroup: Cold War - UPDATED - Norwegian Mechanised & Infantry Battlegroups
Recently I was contacted on the Battlegroup NORTHAG Development Forum by Kit Hohler (known as Eukie on that forum) who had numerous suggestions and corrections for my original Norwegian List.
So now with his invaluable assistance I've been able to seriously update the list which should be quite a bit more historically correct. It has a couple of new infantry options and some new vehicles. Kit also helped sort of my Norwegian Leopard mistakes.
As the list was now looking so good I thought it was about time that I had a crack at writing up a more defined "Home Turf" special rule. It gives you the option of moving a couple of pieces of terrain (hopefully to represent units intimately familiar with their surroundings being able to choose the piece of ground they wish to fight on) or add +1D6 to the forces overall BR. Obviously this needs to be tested to see what impact it has on the game.
Finally I'll be updating the Norwegian AFV Data Table to reflect the fixes and additions over the next few days (probably next week to be honest)
So here is the newly updated list:
Norwegian Mechanised and Infantry Battlegroups
Thanks
Richard
07 January 2019
My Unofficial Battlegroup: Cold War - UPDATED - French Armoured Division Battlegroup -
Hi guys
Just a quick post. Based on some late feedback I have made some very minor changes to the French Armoured Division Battlegroup List. They are:
Just a quick post. Based on some late feedback I have made some very minor changes to the French Armoured Division Battlegroup List. They are:
- The Armoured Voltigeur Platoon has lost its Medium Mortar, which has been replace with a Heavy Mortar.
- The AMX-13 105mm SPG has been more correctly named
- The Dragoon LRRP Patrol has had the 2 APILAS MAW's stripped out (as they were no meant to engage armour). However I have added a single APILAS MAW as an option extra for 10 pts. They have reduced in cost down to 55 pts.
That's it for now.
This week I hope to have the French AFV Data out and I'll review where I got up to with the east German and Polish AFV Data. I'm also starting work on the French Infantry Division List.
Finally I've actually started to paint some Cold War Soviet vehicles again so I may finally be able to post up some pics.
Thanks
Richard
Subscribe to:
Posts (Atom)