Well it's been a while since I've been able to post up anything but new lists, rules etc but my life has finally settled enough that I can start playing a few games.
Back in
December 2017 a couple of mates and I had the first game in my Zealand Campaign. I’m not expecting anyone to remember that (I
barely could) but if you want to read about it, you can find some background
information here, copies of the Operational Orders here, the pre-game and table
set up here, and the After Action Report here.
In a
nutshell, WW3 began on 7 July 1986.
Today’s date is 16 July 1986. Polish
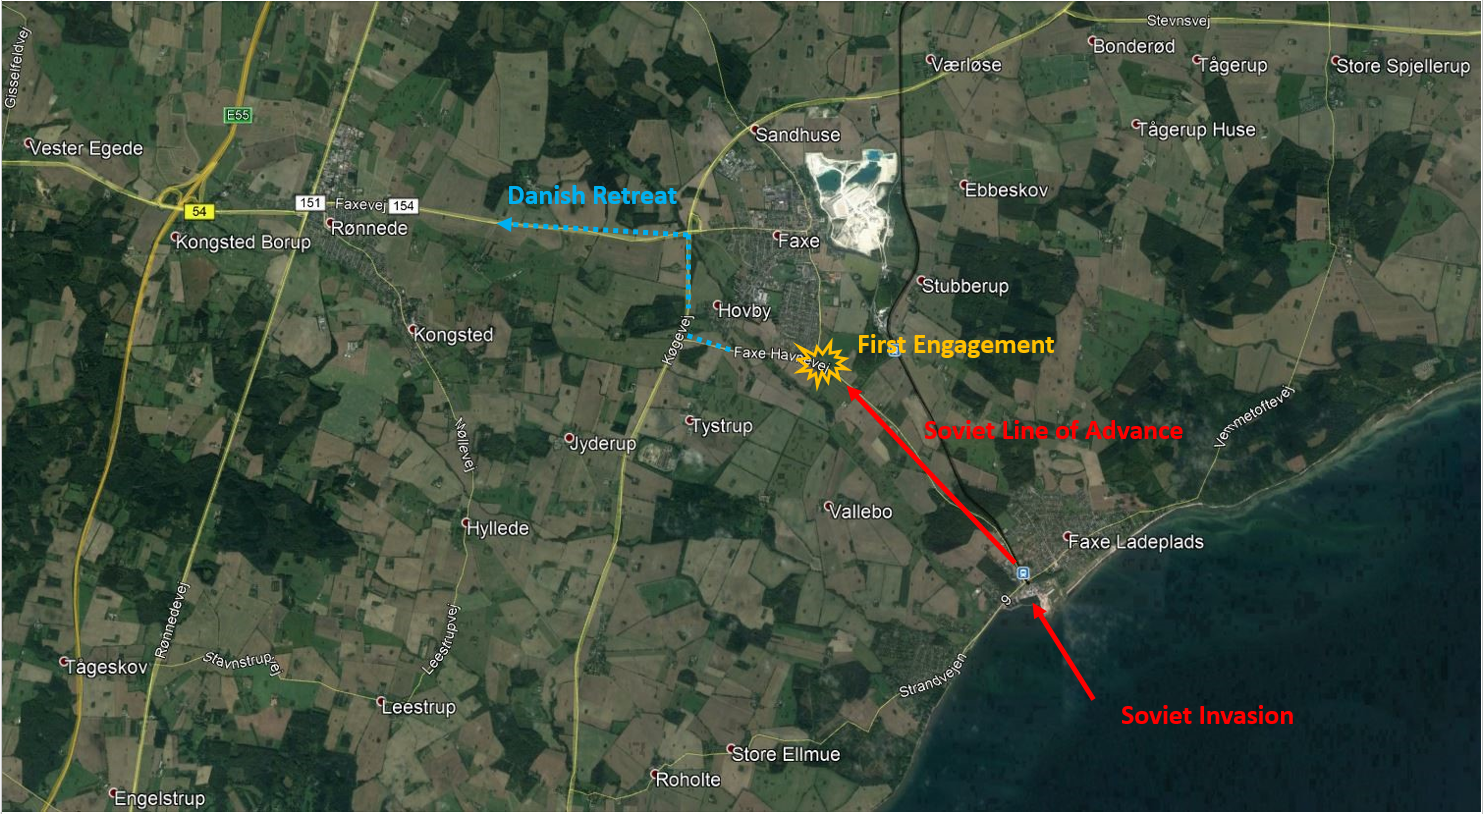
Airborne and Naval Infantry landed on the Danish Island of Zealand yesterday
near Ringsted and Koge respectively. Earlier
this morning elements of the Soviet 336th Naval Infantry Regiment
started landing at the small port of Faxe Ladeplads, to the south of Koge.
In Game
1, the assault elements of 336 NIR set out to establish a beachhead. Driving inland they came across the first
significant Danish resistance to the East of the town Faxe. A small delaying action ensued with the Danes
withdrawing to the West.
Both
sides had incurred casualties, with the Soviets loosing 4 BTR-60PBs plus a
couple of 9P148’s (BRDM-2s with Konkurs ATGMs).
The Danes lost less in terms of numbers, but more in terms of need. They lost a M41 Recon tank and a Centurion Mk
5/2DK.
My first
step was to give the Soviet player a set of choices, in the days before the
game, on how he would proceed. What I
presented to the Soviet player was as follows:
1.
Immediately continue the attack with what you have at hand
This
option gives the Danish player no time to dig in at the next line of resistance,
or replace losses and we will treat the game as a Flanking Attack. However, your force will be similar to Game
1, minus 4 BTR-60s and the 2 Scout Cars with missiles (all losses from Game
1). The battle will take place along the
154 road from Faxe to Ronnede.
2.
Reset Force, allow units to reconstitute back to full strength
This
option will mean that the Soviet forces will not pursue the Danes until about ½
an hour after the first encounter as you sort out casualties, replacements and
new units. It means the Danes will have
had time to set up minimal defences and maybe replace some losses. Your force will be similar to Game 1, fully
reconstituted from Wave 1 reserves. The
battle will take closer to Ronnede, at a place of the Danes choosing and the
game will be a Hasty Defence.
3.
Allow 1st Wave follow-on forces to take over the attack while force from
first contact take over the town of Faxe
This
option will mean that the Soviet forces will not pursue the Danes until about
an hour or more after the first encounter.
It means the Danes will have had time to set up reasonable defences and
replace their losses. Your force will be
tank heavy, with a complete Infantry platoon attached. The battle will be a Deliberate Attack and
the Soviet player will have a choice of approaches to Ronnede.
The Soviet player straight away choose the immediate
follow-on attack option in true Soviet style!
The next choice to make was for the Danish player. I had a good look at the satellite Google map
of the area where the game would now be played and selected two likely spots that
offered some defensible terrain – at least to my very unprofessional eyes. I created two possible game maps from the
image and asked the Danish player to select one to defend.


The Danish player selected Map 1 and then I offered him the
engineering choices I had previously selected from the Danish Defences
options. I choose only those things that
would have taken the engineers limited time to prepare (or perhaps in the case
of the bridge they had been preparing it for a while). Here are the options I presented to him.
Table Option 1
Remote Control Demo of Bridge
Off Table TOW Missile Shot
Or
Improvised Barricades
Improvised Road Block
Cellar Shelter
Off Table TOW Missile Shot
The Danish player selected the option to blow the bridge
(actually I think more of a culvert) and the off table TOW shot.
Then I prepared the mission which I’ve copied in full below:
DANISH CAMPAIGN – SCENARIO 2 –
FOLLOW-ON ATTACK
Situation Report
Following
the earlier engagement, Danish forces have retreated further inland with the
Soviet’s right behind them.
Knowing
the area well the Danish Commander has chosen another spot to defend with the
remnants of his force. The more time he
defends, the more time other Danish reinforcements have to insert themselves
between the Soviet Naval Infantry and the Polish Paratroopers, and secure the
main highway to Copenhagen.
The
Soviet Commander has orders to push inland as fast as possible and secure the
MSR. Time is of the essence, and any
delays will prove costly.
Terrain
The 154
road from Faxe to Ronnede runs along the centre of the table. There is also a secondary road the runs into the
Danish deployment area. The rest of the
table is covered in farmland with a small stream running across the table
crossed by a bridge.
It has
been raining consistently for the last few days and the land is more boggy than
normal. All vehicular off road travel
should subtract 1D6 from the movement rate.
On a “Top Speed” order two rolls of a “1” indicates the vehicle is
bogged.
Victory
The side
that exceeds its Battle Rating must withdraw and losses the battle. The Danish Player cannot claim an All Objectives
Secured victory, but the Soviet player can.
Special Rules
Low
Cloud Cover
If an
aircraft chit is draw, the aircraft becomes available on a roll of a 6+ rather
than a 5+
Pursuit
For each
3 Soviet units that leave the table through the Danish player’s table edge, the
Danish Player must take an additional BR chit
Time
is Pressing
The
Soviet’s do not have much time to remove this obstacle to their advance. If at the start of turn 5 the Danes are still
fighting, the Soviet Player must take a BR chit at the start of each of his
turns.
If the
Danish forces are still fighting at the beginning of turn 10, the Soviet Player
must take two BR chits at the start of each of his turns until the end of the
game.
Deployment
1.
The
table sides each force will deploy in are shown on the map
2.
Place
Objectives
Place
D3+1 objectives on the table. The first
objective is the road junction. The
second is the bridge. After that the
Soviets place and next objective and then the Danes. Repeat as required
3.
Determine
the Defenders Initial Forces and Deploy
At the
beginning of the game, place the Danish player’s defences and D6+6 units on the
table, anywhere in the Danish deployment zone.
Any units not deployed as the Dane’s reinforcements.
4.
Ambush
Fire
D6
Danish units can be placed on Ambush Fire.
5.
Deploy
Attacker’s Initial Forces
The
Soviet player then places all Recon units and 2D6+6 additional units. These may be deployed up to 10” from the
Soviet table edge. Any units not
deployed are the Soviet’s flanking force.
6.
First Turn
The
Soviets are attacking and automatically have the first turn.
7.
Soviet
Flanking Force
Any of
the Soviet player’s units not initially deployed for the attack are his
flanking force, attempting to use side roads to work around the Danish flanks. The Soviet player should write down whether
he wants his flanking force to arrive from the North or the South.
At the
start of Turn 4, start rolling for the arrival of the Soviet flanking
force. On a 4+ they arrive and D6 units
are placed on the northern or southern table edge, within 10” of the centre
line (as written down). They can then be
given orders as normal.
D6 units
will continue to arrive on each subsequent turn until the entire flanking force
is on the table.
8.
Danish
reinforcements
Any Danish
units not initially deployed are reinforcements.
From the
start of Turn 2, roll a D6. On a 4+
Danish reinforcements have arrived. D3
units may be placed on the Danish players’ table edge and can be given orders
from there. D3 units can arrive each
turn until all Danish units are on the table.
So all that was need now was to set up the table according
to the photo and get on with it.
All that plus more in the next post!
Thanks Richard.
Very cool. I'm looking forward to seeing the game.
ReplyDelete