So a quick AAR of how the first CRP game went.
A and B are the positions where the two CFVs deployed, guessing (quite correctly) where the primary routes of attack would be (the thin red arrows).The ensuing morale test is passed on a "6" which leads to a Beyond the Call of Duty test, which is passed. The BMP-2 drives furiously up the road towards the Bradley.
The BMP-2 fires on the M3 with its 30mm cannon and pins it. Things are not looking good for that Bradley.Desperate to assist the M3 on the other flank fires a TOW at the BMP, but misses.
The BMP-2 on the road moves right up to the M3 it pinned last turn and fires again.
It misses completely. I can only imagine the CFV crew were firing off every smoke grenade they had at this point.The other 2 BMP-2s on either side of the road moved up to also take a shot at the pinned M3.
Of course they either fail to see the M3 completely or miss again! A charmed life after all!The NATO turn is very brief. One M3 is pinned, waiting until the end of the turn to un-pin, while the other M3 decides to move back behind cover, to swing around and move closer to the MSR. The M3 is unpinned.
The remaining BMP-2s re-embark their dismounts and head to the bridge. The troops who just watched their BMP drive off into the distance, after throwing their hands in the air with a "What the...." decide it time to get into the house in front of them. The T-72B1 goes on Ambush Fire just in case. The engineers have dismounted and spend the turn checking out the bridge for any hidden demolitions. The NBC BRDM-2 also turns up so my whole force is on the table.
Turn 3 for NATO sees all their reinforcements arrive. The Platoon Commander heads for area B to take over there.
While the other new Bradley stays near the table corner, nearest to the road, so it can look down the road. The originally pinned M3 goes on Ambush Fire while the final CFV heads down the table towards the house the Soviet infantry just went into. The Stinger team deploys and spends the rest of the game wondering what the hell they got themselves into!
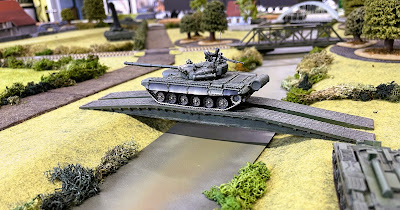
Next turn sees the MTU-55 deploy it's bridge
Fortunately I drew "System Malfunction" and played it on the offending M3's fire control systems, which started to go into meltdown.
They now knew they could take just one more shot before the fire controls completely failed. (Photo is from a little later).The last 2 BMP-2s advanced up to the bridge, while the engineers who have remounted their BTR motor across and try to hid behind the building!
NATO now attempts to sling an Ambush Fire TOW missile down the road into the front BMP-2. Its a hit and as I start writing letters home to distraught parents I let the NATO player know he needs 3 or above on 2D6 to kill the BMP-2. So course he rolls a "3" and so only manages to pin the BMP-2 which also passes its morale check. Unbelievable!I'm not sure if this is possible or at the very least advisable in real life, but my T-72B1 now took a couple of unsuccessful shots from the MTU bridge - really just to annoy the engineers rather than any likely chance of hitting!
The NBC BRDM-2 is ready and waiting to cross the bridge once the T-72 decides to stop using it as a firing point.The next NATO turn was very uneventful, largely due to a grand total of 2 orders. The FASCAM barrage arrived, unfortunately for NATO in a spot which while annoying to me would have no great impact on the outcome of the game. So apart from some shuffling about, not real damage occurred to the Soviets.
So in my final turn, I decided that RPGs seemed to be the one thing that could consistently kill M3s so I advanced my only active BMP-2 as far down the road as it could go and punched out the infantry.
Not quite point blank range but almost.That's now 2 smoking M3s - both taken out by RPGs. This pushed the NATO force over their BR limit and ended the game. WARPAC win!As I said I might re-jig the NATO force slightly and run this mission again, this time solo. I did give the NATO player a chemical smoke barrage which I want to test, but the NATO player went for HE over smoke. I'd also like to deploy the FASCAM barrage a little earlier - so see if it actually has an impact on a small table like this.
Anyway - I hope to have another go at this mission shortly.
Thanks for looking
Richard


Interesting game. The number of moving parts is smaller than most games and that is welcome since the narrative developes nicely. The tank firing on the bridge, sy loosrn a few rivets!
ReplyDeleteFantastic.
ReplyDelete