28 May 2017

Even more Revell Leopard 1A5s

Well it's about time I posted again - it's not like I haven't been doing anything - the exact opposite actually - been very busy doing some commissions and stuff for other people.  These Leopard 1A5s are sadly not for me (I need a couple more to finish my platoon).

As I've said before - it's a great kit and is generally a pleasure to put together.  Anjd here is the finished product:


So there we are - job done and time to move on to some of my own stuff for a week.

Thanks

Richard

07 May 2017

Matchbox Phantom FG1/FGR2 - Revisited & Completed (Again!)

Well - as I posted last time I've revisited my Matchbox Phantom FG1/FGR2 kit that I "finished" back in December last year.  Back then, Paul Foster commented that the model might pop a bit more if I did the panel lines.  I completely agreed with him, and when the right product came along I decided to have a crack at it.

So here's the original:


And here's the new version


Original


New


Original


New


Original


New


So there we go - all done.  Interested in what you think of the panel lines - particularly on the top of the aircraft.  Too dark?  I'm not sure.  Typing this I just realised that I still need to hit it with a flat coat.  I wonder whether this will tone down the darker panel lines somewhat.

Oh well - I guess it's not finished after all.....  Will any of these projects ever end!!!!!

Richard

04 May 2017

Matchbox Phantom FG1/FGR2 - Revisited

Well this is actually a revisit rather than a proper Work-In-Progress.

I try and keep an eye out on new products or procedures that will help my modelling - particularly my aircraft modeling which is not great.  I stumbled across this product...


...and did a bit of investigating, watched a couple of clips on Youtube, and thought I'd give it a go.

So
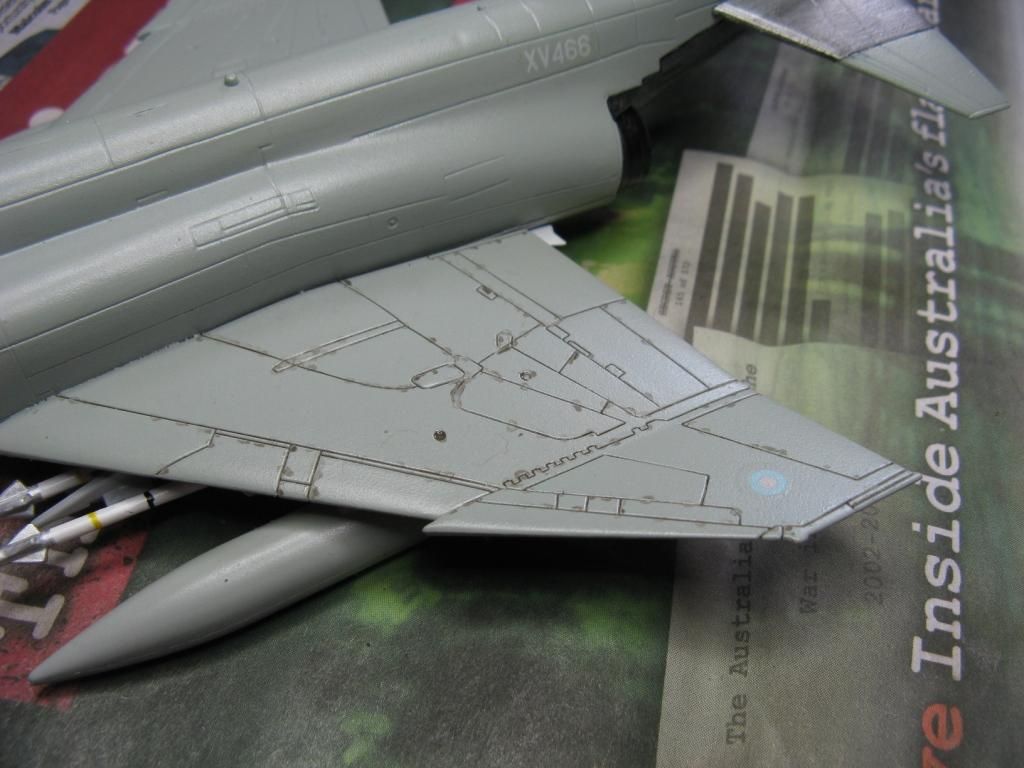
I re-sprayed my Phantom with an Acrylic Gloss coat, and started to have use the Panel Line Wash:


This is what it looks like when you pin wash the panel lines.  It doesn't take long as the wash flows nicely along the lines when you dot it on a panel line.  I've used the darkest grey wash here as I tried the medium wash and you couldn't see it very well.  I might try the medium on the underside of the plane as it is lighter.

The idea is you pin wash it one, and then use MiG Enamel thinners to carefully wipe it off, leaving the wash in the panel lines.  It takes a bit of effort - and I'm sure the way I'm doing it is not 100% fantastic - but so far I think it looks better.  I should probably have started on a brown or green plane to start with but the Phantom is the plane that needs the effect the most.

Next time I show the Phantom - hopefully it will look significantly better!

Thanks

Richard

02 May 2017

Back to the BAOR - Objective Complete

Here we go with another completed little side project - done really just to do something a little bit different.  Eventually I'd love to have a set of themed objective markers, and I had to start somewhere, so why not with a damaged Cromwell Models FV432.

Here it is:


And now the separate components:


The FV432 - showing the damage to the model.  I tried to make it look burnt out - not sure if it really shows up in this pic.

And the base:


And that's it!

Don't worry though - the next post will be another WIP!

Thanks

Richard