An “Armoured Vehicle Heavy” Scenario Designed for Play with Ambush Alley’s Force of Force It is spring 1987, and long feared Soviet invasion of West Germany has taken place. NATO forces have been forced back all along the Inter-German Border. Across the front, the remnants of larger NATO Armoured Cavalry and Mechanized Infantry units are selling their lives in an attempt to give their comrades in the next line of defence more time to prepare for the WARPAC onslaught.
From the small hamlet of Füssel, just west of the IGB in the CENTAG a small rearguard of West German Panzer Grenadiers shelters as the first salvo of Soviet artillery impacts nearby. Approaching them are the reconnaissance elements of the 20th Guards Motorised Rifle Division.
(This scenario is in homage to the 1st Scenario in the board game “Team Yankee” by Games Designer Workshop).SCENARIO INFORMATION Duration of Game: 8 turns.
Initiative: The Soviets have the initiative for the first turn. From the 2nd turn onwards, roll for initiative each turn.
Special Conditions: Holding the HamletNATO forces begin the game in possession of the hamlet, Füssel. Victory in the game will depend on how long the NATO forces can hold the hamlet, or how quickly Soviet forces can take it.
WithdrawalNATO forces can begin to withdraw from Füssel at any time they choose. Of course to do so to early will have victory points implications
HiddenAll NATO forces that begin the game on the board, may deploy hidden. Reserves should refer to Table 1.
Panzer Recce Troop Random EntryBefore the Game begins the NATO player secretly rolls on the chart below noting the result. The chart indicates where each of the Leopard 2A4’s begins the game.
Table 1
Roll on 1D8 Result
1 What Leopards? – It appears your armoured reserve has already been destroyed or sent to help another, more desperate unit.
2 At the start of the NATO players turn 3 both Leopard II deploy on the board in ambush in prepared positions at C
3 At the start of the NATO players turn 3 a Leopard II is deployed from hiding at the Walled Farm while the other is deployed in hiding in prepared positions at C.
4-5 At the start of the NATO players turn 3 both Leopard IIs deploy anywhere in the village from hiding.
6 At the start of the NATO players turn 3 both Leopard IIs enter the board at B
7 At the start of the NATO players turn 3 both Leopard IIs deploy on the board in ambush in prepared positions at C
8 In addition to the 2 Leopard 2A4’s you have 2 Leopard 1A4’s! In turn 3 deploy the Leopard II’s in hiding in prepared positions at C, with the Leopard I’s in hiding in prepared positions at D.
Soviet Deployment ZonesThe map of the table is marked with 3 separate deployment zones. The 3 Soviet platoons begin the game on the table, each can be placed anywhere by the Soviet player, within their respective deployment zone. The woods should continue into the 3 deployment zones until they reach ther table edge.
Fog of War: Each player draws one Fog of War card at the beginning of turn 1. Further Fog of War cards are triggered by Reaction Tests
SCENARIO DIAGRAM 9’ x 5’ for 20mm or larger (a table tennis table)
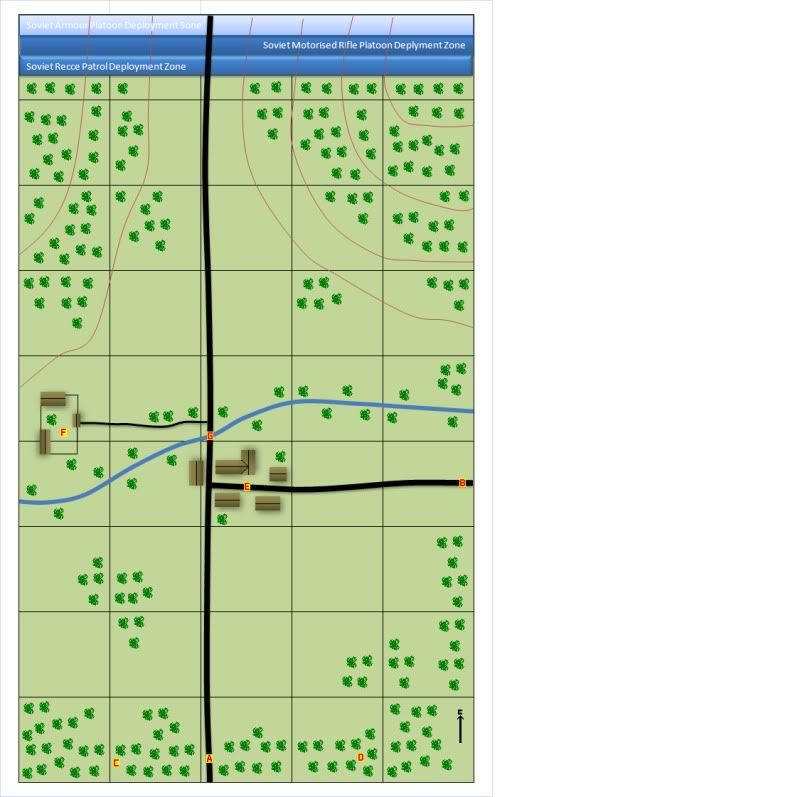
A: NATO withdrawal point and Soviet objective
B: Secondary Road
C: Woods
D: Woods
E: Walled Farm
F: Fussel
G: Bridge
The WoodsAll the woods on the board should be considered Average.
FüsselThe houses that make up the hamlet of Füssel count as a Decent Average buildings that have not been fortified.
The Walled FarmThe Walled Farm counts as Decent Average buildings that have not been fortified.
Open AreasAll open areas on the board can be made into fenced fields if both players would like to do so.
The River & the BridgeThe bridge is the only location where non-amphibious vehicles can cross the river. It is wide enough for one vehicle at a time and if a large armoured vehicle is destroyed on the bridge, it is blocked.
NATO MISSION After smashing the leading armoured regiments of the 20th Guards Motorised Rifle Division, the now severely written down Panzer Division defending this potion of the IGB has had to withdraw.
Preparations at the next defensive line have nearly been finalised, but in order to by some time, a small rearguard force has been left to defend the small hamlet of Füssel. Füssel surrounds a road intersection, both of which lie along the main route of advance of the Soviet division.
The Bundeswehr troops have been ordered to
1. hold the hamlet for a long as possible,
2. inflict as much damage on the Soviet force as possible,
3. withdraw of the west edge of the map once the hamlet can not be held
4. do so without loosing to many of their own assets.
NATO ASSET CARDS Off Board Light Artillery Support with 3 fire missions available (these can be either HE or Smoke)
VICTORY POINTS Each Soviet soldier KIA: +1/2 points
Each Soviet Vehicle Destroyed: + 3 points
Each NATO Vehicle Destroyed: - 5 points
Hamlet held at end of turn 3: + 1 points
Hamlet held at end of turn 4: + 3 points
Hamlet held at end of turn 5: + 5 points
Hamlet held at end of turn 6: + 10 points
Each Marder successfully withdrawn pass point A: + 2 points
Each Leopard successfully withdrawn pass point A: + 1 points (if they start the game east of point A)
NATO FORCES The war has just begun and despite the shock of the attack the West German troops remain Confident with Normal Supply levels, TQ d8 and Morale d10.
BUNDESWEHRPanzer Grenadier Company RemnantsPlatoon Commander – POSITIVE LEADER (Uzi)
1 x Marder 1A2 – Gruppenführer (Uzi), a 3 man Fire Team (3 x G3) and a 2 man MG team (1 x MG3 and 1 x G3 loader). The fire team may fire 1 Pzf-44 rocket per turn.
1 x Marder 1A2 – Gruppenführer (Uzi), a 3 man Fire Team (3 x G3) and a 2 man MG team (1 x MG3 and 1 x G3 loader). The fire team may fire 1 Pzf-44 rocket per turn.
NB. If Milan ATGM is dismounted from a Marder 1A2 the squad is split into 2 as follows:
2 man AT Team: Milan ATGM (G3 secondary weapon) and 1 x G3 (loader)
4 man Fire Team (Gruppenführer (Uzi) 2xG3 and MG3 LMG).
It takes on activation to remove the Milan ATGM from the Marder, unless the Milan begins the game dismounted.
The remnants of the Bundeswehr Panzer Grenadier Company begins the game on the table. The NATO player can deploy the units at either Füssel or the Walled Farm or anywhere west of the Secondary Road as indicated on the map. Note that deploying the Marders to far away from their dismounts may cause the NATO player difficulties when trying to withdraw off the board.
Panzer Recce Troop2 x Leopard 2A4
SOVIET MISSION The commander of the 20th MRD is annoyed. His leading regiment has succeeded in pushing the Germans off their first defensive line, but at a huge cost and now, much delay as the division sorts itself out. He now needs the remnants of his reconnaissance force to quickly find the next line of resistance. He also has a reasonably good idea of where this will be and it definitely won’t be Füssel. But that doesn’t mean for a second that the Germans won’t leave the small hamlet undefended.
He has ordered the reconnaissance force to rapidly defeat whatever force is in Füssel without slowing.
The Soviet player must
1. Clear the town of all enemy
2. Defeat any NATO forces
3. Exit of the table at Point A
SOVIET ASSET CARDS Off Board Light Artillery Support available each turn of the game (with one 1 smoke mission over the course of the game).
VICTORY POINTS Each NATO soldier KIA: +1/2 points
Each NATO Vehicle Destroyed: + 5 points
Hamlet captured at end of turn 3: + 10 points
Hamlet captured at end of turn 4: + 5 points
Hamlet captured at end of turn 5: + 3 points
Hamlet captured at end of turn 6: + 1points
Each Soviet Vehicle exits past point A +2 points
SOVIET FORCES The war has just begun and the Soviets are confident of victory and are therefore rate High Confidence with Normal Supply levels, TQ d8 and Morale d8.
Soviet Recce Patrol2 x BDRM Reconnaissance armoured cars
Soviet Armoured Platoon 3 x T-72 MBTs
Soviet Mechanised Rifle Platoon1 x Soviet BMP-1 with Platoon Commander (AKM), and a Rifle Team (3xAKM), Support Team (1xPKM, 1xAKM) and sniper (SVD)
3 x Soviet BMP-1 each with Motorised Rifle Squad consisting of Rifle Team (2xAKM, 1xUGL, 1xRPK) and Support Team (2xAKM, 1xPKM, 1xRPG)


