Game 3 was a much much much bigger game, played on a long table with 2 Soviet players and 3 NATO players. Bottom line - we didn't finish the game, but everyone seemed to enjoy themselves none the less.
First - let's have a look at the table:

This is Hünfeld, the town at the Western end of the table.

Looking west, towards Hünfeld. I wanted there to be a couple of wide spaces on the table for a planned air assault - which we ended up not doing... Best laid plans and all that...

The bridge in the centre of the table crossing an autobahn. Ignore all the vehicles as the photo was taken before the game began. The bridge was essentially the centre of the table.

Same view from the other side of the table.

Another view from the east lokking west at the centre of the table.

The table centre looking east. We rated the vertical area near the bridge as impassable, while the sloped areas were -1D6 to vehicle movement.

An overview shot of the Eastern table half.

A small village at the extreme east of the table, with a small bridge over a very small stream. Again - this was ruled as impassable - so the Soviets would use their MTU-55 AVLB. On review - perhaps not such a great idea...

Cars were used as objective markers - with 5 used in total - 1 each for the two bridges - and one for each of the three main intersections on the main road. Capturing the bridge would cause you opponent to pull 2 chits.
GAME 3 - Forces
The Soviet force – Fwd HQ (BTR-70), Signals Unit (Zil Van), FAC (UAZ-469), FO Team (UAZ-469, 2 x T-80 Platoons (5 tanks total – reduced by 1 tank because of Game 2), 1 x BTR-70 Company (9 BTRs in total – reduced by 1 as a result of Game 2), full support options in BTR-70s – so a SAM Section, AGL section, ATGM section, 120mm Mortar and tow and a Fire Support Section, 1 x BTR-70 w/Combat Engineer squad, 1 x MTU-55 AVLB (Bridgelayer), 3 x 2S1 (122mm SP Arty), 1 x ZSU-23-4, 1 x SA-13, 1 x BRDM-2 AT-5. Phew - out of breath...
The Soviets had 7 timed strikes in total…. which sounds like a lot. The first one did this:

Pinning several West German police teams, but most of the rest of them did this:

Hitting empty fields... that what happens when you play on a 27 foot long table...
I had created a couple of hex maps to allow plotting of timed strikes before the game:

The Eastern half of the table.
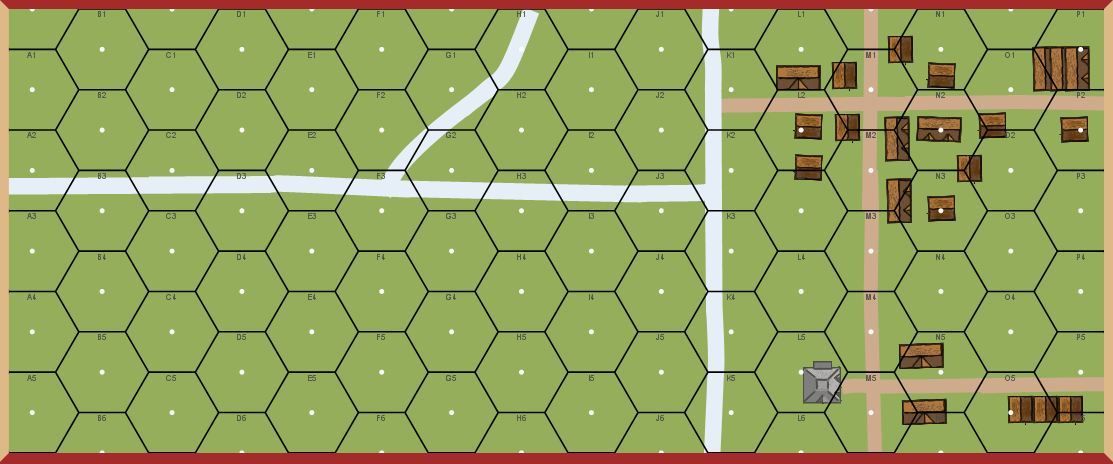
The Western half. The bridge area was a no-go area for artillery (conveniently).
The West German Forces - the West Germans actually had 4 separate forces – some of which were on the table before the game (we had 6 pre-game turns of the West Germans moving around, getting stuff ready on the table before the game officially began).
Force 1 – West German Police – a command squad, a rifle
squad (w/a Pzf 44) and a MG Squad
Force 2 – Home Defence Platoon – 1 Infantry Platoon
mounted in trucks with 1 x Jagdpanzer Kanone and a Static mount Bofors 40 L/40
AA gun. Also available as part of this
force was a Leopard 2 whose crew was having a bit of R&R and a broken down Leopard 2 that was in the process of
being fixed by a M88A1 as the game began. Finally they had a Bundeswehr Pionner Squad in a Fuchs.


Force 3 – Fallschirmjager – 1 FJ Platoon that were air
transported onto the board before the game began along with an Improved TOW
KraKa, a Milan KraKa, a 20mm AA Kraka and a supply KraKa
Force 4 – BGHQ (Marder) 1 x PzrGren Platoon (3 Marders),
1 x Panzer Platoon (3 Leopard 1A4), 1 x Gepard, 1 x Panzermorser (120mm SP
Mortar), 1 x Beobachtungspanzer, 1 x Off Table 3 gun 155mm Battery. This force started coming on down near Hünfeld several turns into the actual game.
As I said earlier, prior to the game starting we had 6 pre-game turns for the West Germans. The only unit who actually started on the board was Force 1 - who were placed into the houses near the bridge.
The R&R Leopard 2 crew were activated and mounted their tank while the other Leopard continued to have work done on it. Over the course of the next few turns, the Territorials came onto the table and moved upto and over the bridge, with the AAA gun deployed near the bridge. They were followed by the first Leopard and the Fuchs, who deploye the pioneers to lay a minefield. The players then had a choice of where to land their Fallshirmjager (helicopter) and choose to land on the Eastern side of the bridge - ready to defend as far forward as possible.
On the final pre-game turn, the damaged Leopard was fully restored and began to drive forwards. The Soviets got a small pre-game bombardment (one of the timed strikes) which pinned down the police units - and many West German units went onto overwatch.
The Reds were coming....
More to come soon
Richard
And we wait with baited breath
ReplyDeleteExcellent scenario, nice setup! Thanks for sharing and I look forward to more!
ReplyDeleteThat looks like a proper setup certainly. What did you use to make the maps?
ReplyDeleteVery good report, nicely build up.
ReplyDeleteThat is an amazing board! I cant wait to see the game play out.
ReplyDeleteGood stuff- keep it coming...
ReplyDeleteCheers,
Pete.
I fear I may be building this up a little too much... The maps were used primarily before the game to write down where and when timed strikes were coming in. I had planned to use the maps and hexes to call in artillery fire during the game - but we didn't like how it functioned so we scrapped that and went back to our standard artillery rules.
ReplyDeleteRichard
Is that Geo-Hex I see? I have the "Starter" set. One of my most prized wargame accessories!
ReplyDeleteOh damn your right, I had forgot about those things. Might look back into them
DeleteYes - my mate Simon has a metric ton of geohex - took several hours to adjust the table to look like it does as it's 27 feet long!
ReplyDeleteRichard
Very nice Richard - who makes the road bridge? Is it a railway model?
ReplyDeletelooking forward to seeing pics of the models
ReplyDeleteThe small bridge is a railway model, the much larger one is from Frontline. Hope that helps.
ReplyDeleteRichard