05 July 2012

S and S T-55 AVLB

Well this will be my last post for a few weeks as I'm going on holidays and doubt I'll have the chance or ability to post anything - may be - you never know.

Review and Build

The S&S T-55 AVLB is one of their newer models and it shows.  The resin is clean and near 100% few of bubbles or deformities.  As always the metal is very crisp and clean.  Not much claning was required on this model at all.

Everything I have to say about this kit is essentially positive.  Not only do you get a great little T-55 AVLB with a folded bridge, but you also get a deployed bridge included.  The bridge laying mechanism can be put together so you can have it on your tabletop driving to the river (withthe bridge on top of it) but once you reach the river and deploy the bridge, you can simply take off the folded bridge, lower the bridge laying mechanism and park the AVLB next to the bridge.  Pretty cool in my opinion.

If anything left a little to be desired, its the instructions - which are fairly basic - but very, very useful no the less.  After a bit of fiddling and working out how the photos in the instructions related to the model I had no real problems.  Everything fit together very well and nothing had to be trimmed or anything like that.

I totally rate this kit and am very impressed with it.

Here's some photos of the S&S T-55 AVLB:


And the bridge:


and finally the bridge with a T-72 crossing it:


That's it.  See you ina few weeks and have fun...

Richard


03 July 2012

Cromwell Models FV434

Sticking to the British theme - the next up is a Cromwell Models FV434 Armoured Recovery Vehicle.

You find find out a little about the real deal here on wikipedia witha selection of good photos here

Again this is a second hand model which I just had to fix a little and then paint.  It's slightly smaller than my Britannia FV432's but I can easily live with that.  I'll be using this as a HQ attachment to my FV432 mounted Mechanised Infantry Company.

Not much more to say so on with the photos:


You can see on this one I added a little bit of green stuff to look like a oily towel or something like that.  One I'd painted it I kicked myself, because if I had thought of it previously I would had tried to sculpt it into a DPM jacket, which I think would have looked a lot cooler.


There a variety of video clips on youtube - including a whole series of some guys re-fitting an FV434.  Here a couple of others:

:


Spot the FV434 in this lot


Thanks and have fun...
Richard

28 June 2012

S and S FV512 Warrior MCRV

To complement my (reduced) Warrior MCV company I needed to get a Warrior Mechanised Combat Repair Vehicle - which would be attached to my HQ Section.

S&S models do a nice little Warrior ARV which fits the bill nicely - and is far as I'm aware the only one out there.  Once again I got mine second hand, and it was missing the machinegun for the mini-turret, so I simply contacted Shaun who sent me one when I picked up my T-55 AVLB - for free.  He's a very nice chap and provides excellent customer service.

Review - and build
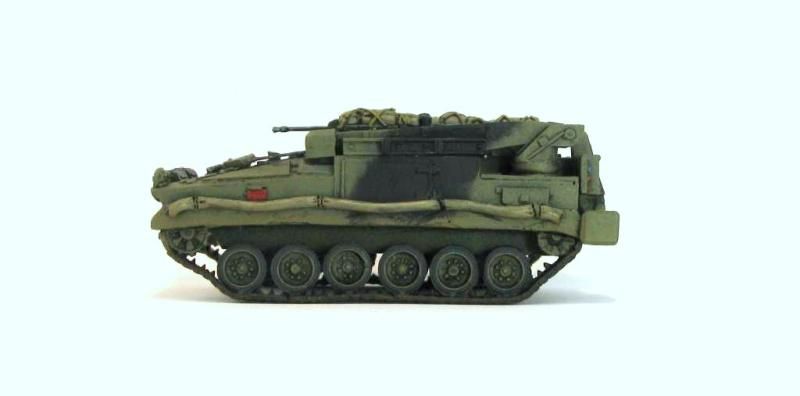
I beleive the S&S Warrior ARV is one of their older models and in some ways it shows - especially when you compare it to their new moulds.  Mine was a little worse for wear and I found it easier to cut off and replace all the vision blocks on the mini-turret rather than just try and fix them.  There was also some damage along one side of the vehicle, one of the driving lights was wrecked and some rods along the front needed to be replaced.

Reference pics showed rolled up tarps or nets along the sides of the hull - so with my fairly weak green stuff skills I was able to add rolled tarps to each side to cover any damage.  Again I attempted to use green stuff to fix up the driving light, and after I removed the rods along the front I completely forgot to replace them!  Duh!

The tracks are metal and had to be manouvred a bit to fit properly - but I like them.  A number of other metal peices come with the kit and but looking at online photos it was relatively easy to work out where they go.

The crane (another metal bit - well about 3 bits actually) can be portrayed resting (?) or raised.  The winch head (again ? - my crane knowledge is obviously quite bad!) is designed to show the crane in use, so I cut of the wires and attached new ones to try and match pictures I had with the winch head secured to the hull.

So - overall I think this is a very sexy little kit - an excellent wargaming model.  Apart from being the only one out there - it produces a lovely looking Warrior MCRV (in my opinion) - which will add some nice variety to a Warrior Company.

Here's some pics of mine:


From the front - you can see where I forgot to reattach some rods, the reconstructed light of the right, the new vision blocks on the turret and the tarp along the side.  You can also see the front of the crane and the winch head resting on the hull.


The left hand side - which provides a great view of the crane and the support that gets lowered to the ground at the read of the vehicle.


The right hand side - showing all the cool storgae areas, and a better view of the turret.


The read view - showing the system that is lowered to the ground when the crane is in operation.


Rear top view


Front top view


And finally a comparison rear top view (sorry about the lean...) of the S&S Warrior ARV beside a Revell Warrior MCV.

That's all for now - couldn't find any videos...

Have fun...

Richard

25 June 2012

Cromwell Models Ferret Mk2 Armoured Car

If you're trying to put together a representative British Army of the Rhine (BAOR) wargaming force it's pretty hard to do without wanting to get a Ferret Armoured Car or two into your force.  This was a great little armoured car, with a myriad of uses that pretty much shows up on every British Army TO&E of the period - even in those that weren't supposed to have them.

Some basic info on the Ferret can be found on wikipedia here and here which is a website dedicated to the Ferret.

My Ferret is a second hand Cromwell Models Ferret Mk2.  As I got it second hand I can't tell you too much about constrcution etc - as it was already put together.

However it took all of about 20 minutes to paint and came out looking something like this:


So not the world's greatest paint job - but very servicable in my book.

My current plans are to use this as an attachment to my FV432 Mech Infantry Company or Tank Squadron - probably as a vehicle for my FAO.  Nice small target.

Here are some couple of cool videos of the Ferret:


Have fun Richard

20 June 2012

Task 3 Bits and Bobs - Completed

Well I've managed to finished my next task for the 2012 Guild group build.  The curse of the Work-In-Progress thread did not eventuate - however I had to drop off the West German Biber and the F-19 GhostRider until some later date as I needed to get some other things done before going away for a month.

So anyway - here is the completed Build:


The build includes:


At the back - S&S T-55 AVLB or MTU-55 with spare deployed bridge

In the middle from left to right - MMS Stalwart, S&S Warrior ARV, Trumpeter T-55 with KMT-5, Cromwell Models Chieftain Mk5 ARV, Cromwell Models FV434

Front - Cromwell Models (I've been informed - sorry about the misinformation Andy) Ferret

I'll post up a range of individual pics and close-ups over the course of the next week or so.
 
Thanks and have fun...
 
Richard

15 June 2012

Bits & Bobs - A Work-In-Progress Part 3

Here's a little more progress... 

First the Soviets:


And now some BAOR vehicles:


This pic is a lot more yellow than reality - but I'll deal with that once I post up the finished pics.

That's all for now - maybe some more over the weekend.

Have fun...

Richard

11 June 2012

Bits & Bobs - A Work-In-Progress Part 2

I was able to get a bit of work done on the build over the weekend.  Primarily spraying the undercoats and base coats, and doing the first cam stripes on the British vehicles.  Also managed to pin wash the Soviet and British vehicles.  I've decided to leave the West German Biber to last - just in case I run out of time...  Bettter to finish some than try and do them all at once and get none done!

Anyway - here are the Part 2 pics:


and


Sorry about the crap photos - but it was done very quickly.

The Ferret is actually 99% finished - I may takes some better pics of it this week.

On with the show...

Have fun

Richard